Category Archives: Uncategorized
A/C Troubleshooting chart

Thank you for visiting my blog I would appreciate any feedback I can get, Please leave a comment on whether my information has helped you. I am always interested in more topic to write so feel free to leave a comment asking about anything related to HVAC-R(Heating, Ventilation ,air conditioning, refrigeration).
Thanks for reading my blog
Air conditioning basics
Connecting Air Conditioning manifold
The gauges will have a high pressure (red) and low pressure (blue). The easiest way to remember which hose goes to the correct line is to think about a fluid going through the system. A smaller pipe size would need more pressure to move the same amount of fluid than a larger pipe size. So that would mean the smaller pipe will have the high pressure (red) hose from your manifold gauge set. While the larger pipe will have the lower pressure (blue) hose from your manifold gauge set. Yellow hose is for adding charge to you system, big black hose on 4-line gauge set is for vacuuming system down to 500 microns.
Approach Temperature method
This method can verify refrigerant charge without connecting a refrigerant gauge set. Before you begin the evaporator (inside coil above furnace) and condenser (outside coil) must be clean. You will find the approach temperature chart either in the manufacturers installation instructions or on the panel for the condenser. This chart will be specific to the condenser you are working on and will differ from other units.
Measure temperature of the air entering the condenser in a few places to get the average temperature being careful that the sun does not affect the measurements. Then measure the liquid line temperature (small line) with an accurate clamp thermometer. Determine the temperature difference between the liquid line temperature and the outdoor air temperature. The temperature difference is the approach temperature.
Adding refrigerant will decrease the approach and removing refrigerant will increase approach. Allow 10-15 minutes of operation for the approach to stabilize after refrigerant is added or removed. Insure you use proper recovery containers when removing refrigerant since it is against the law to release into atmosphere and comes with a big fine if caught.
Liquid line temp – ambient temp = approach temp
Superheat
Measuring Superheat tells you how effective the evaporator is working; normally best 10 to 15 superheat for air conditioning.
Superheat is the amount of heat added after the gas changes from a liquid to a vapor. Proper Superheat set point is important to an air conditioning system for these reasons
Low Superheat can cause liquid to get back to the compressor breaking internal parts.
High superheat will reduce the effective cooling, which happens best when liquid refrigerant changes state from a liquid to a vapor, also if too much superheat the compressor can overheat.
To measure superheat use the low pressure (blue) line of the refrigerant gauge set and clamp on thermistor to measure temperature at the suction line as close to the evaporator as possible. Suction line as close to evaporator outlet – saturation temperature of the refrigerant= Superheat
Subcooling
Subcooling tells you how effective the condenser is working normally you want 10 degrees subcooling but should always follow manufactures recommendations. Subcooling is the amount of heat removed by the condenser past the point of change from vapor to a liquid (saturation point). Proper Subcooling set point is important to an air conditioning system for these reasons.
Subcooling insures a solid column of liquid to the metering device and if set too low you could get flash gas, which will affect the meter device.
High subcooling will cause the refrigerant to stack up in the condensing unit bringing up the head pressure in the compressor. With higher pressures the compressor will need to work harder using more electricity and wearing it out faster.
Thank you for visiting my blog I would appreciate any feedback I can get, Please leave a comment on whether my information has helped you. I am always interested in more topics to write so feel free to leave a comment asking about anything related to HVAC-R (Heating, Ventilation, air conditioning, refrigeration).
Presures
High side is ambient plus 30. A 75 degree ambient, for example, add 30 and get 105 degrees. That, on a P/T chart converts to about 253 psi
Low pressure side should run about 10 degrees cooler than space set point.
Thanks for reading my blog
Recommended tools
Fluke 116/322 HVAC combo kit basic multimeter and amp clamp that will do anything in residential diagnostics.
Fluke 87V Digital Multimeter if you are working on any Engineer MUA (Make Up Air) or RTU (Roof Top Unit) you need the percent duty cycle option to set up combustion motor speed sensor properly.
Cooper SH66A Multi-temperature thermometer instrument. Good for measuring temperature on pipe or airflow
Ritchie Yellow Jacket LCD Vacuum Gauge 69075 senses the full range from atmospheric pressure down to 1 micron. I have had mine for 6 years and have never had any problems with it. It will give you exact number read out not just lights to indicate vacuum pressure
D-TEK Select Refrigerant leak detector this leak detector is the best one I have used it is very sensitive and will find the smallest leak. Some people believe it is too sensitive, because sometimes when it is moved fast it will beep. If you use the meter properly by moving it slowly around the leaks it will prove to be the best meter on the market. I would rather have a few false readings then to miss a leak that would cause me to return to the same job site a few times on callbacks.
Fluke Alert Voltage Detector A/C 90-1000 Volts-1AC-A1-II & A/C 20-90 Volts. I always carry one of these detectors around sometimes I can diagnose a problem with it or double-check the power for safety. Always test detector against known power and use meters to insure all power is turned off.
Testo 510 Manometer is the best manometer I have found that will measure differential pressures. The unit has many switchable units of measure. Very accurate as mine is 6 years old and has never required calibration. Only complaint is max pressure 1.5 PSI.
Powers Pneumatic Calibration kit 832-177 comes with Siemens adapters should buy Honeywell and Johnson adaptor kits as well in order to do all thermostats.
Procore Ratchet Wrench 17-9568 only 5 degrees of operation is needed to use this wrench. All wrenches have opened end and ratchet box end, which makes easy work in tight places.
If anyone has a better meter they use please send a comment to me and I will add it. I know fluke has a new one with flexible amp clamp, but I do not have the meter so I can’t comment on it
Thank you for visiting my blog I would appreciate any feedback I can get, Please leave a comment on whether my information has helped you. I am always interested in more topics to write so feel free to leave a comment asking about anything related to HVAC-R (Heating, Ventilation, air conditioning, refrigeration).
Thanks for reading my blog
Engineered air rooftop units
Engineered air pre-purge error
Combustion motor on engineered air units are variable speed, which are controlled by the hertz to the motor. Voltage will always remain constant and to slow down the motor the DJM2 controller will run between 15-59 Hz. If the reading it over 59 Hz then the speed sensor is grounded and the wire and/or sensor need to be replaced, 3450 RPM equals 59 Hz.
- If combustion motor is running first check tachometer signal, Y to G should run between 4-6 VAC. If AC is not present check that the sensor is 1/16 inch from magnet at the end of combustion motor shaft. Also insure the sensor is not over the centre of the shaft, But rather it is off to one side of the magnet.
- If voltage is within 4-6 VAC, The DJM2 is sensitive to the shape of the waveform produced by the speed sensor. You will need a fluke 80 series similar multi meter that can measure percent duty cycle. Connect meter to Y and G press Hz for Hertz then second time for duty cycle. Speed sensor will output a signal close to 50% duty cycle and must be accurate within 2.5%. If the number is outside those parameters the pre-purge problem light will flash
- Many time the only thing wrong with this system is the magnet at the end on the motor shaft. By flipping over the magnet sometime will fix the problem

Thank you for visiting my blog I would appreciate any feedback I can get, Please leave a comment on whether my information has helped you. I am always interested in more topic to write so feel free to leave a comment asking about anything related to HVAC-R (Heating, Ventilation, air conditioning, refrigeration).
Thanks for reading my blog
Flame Sensor failure video
In this flame sensor video you will see the sequence a furnace will take when you have a flame failure. The burners will try to light 5 times then go into lock out for 3 hours before it will try again. Another thing to keep eye on is the diagnostic light on the circuit board of the furnace located middle to the left side. You will see it flashing different codes count the flashes as it changes 4 times. short and long flashes
- 1st code 12 meaning blower delay time, will change to next code solid light on after 34
- 2nd code will be on solid for call for heat, flames fail and change to code 34 after 50 sec
- 3rd code will be 34 for ignition proving failure, will change to code 14 after 4th try to ignite after 2 min 48 seconds
- 4th code 14 ignition lockout. The furnace will be locked out for 3 hours before it tries again, you will need to reset power for furnace to try again by shutting power off then back on after a couple minutes or turning temperature down then up again.
95 percent of the time the problem is only a maintenance issue and just needs the flame sensor cleanedClick on this link to see the video furnace flame failure video
Click here to see my Post on protecting your home ” Alarm for home”
Thank you for visiting my blog I would appreciate any feedback I can get, Please leave a comment on whether my information has helped you. I am always interested in more topic to write so feel free to leave a comment asking about anything related to HVAC-R (Heating, Ventilation, air conditioning, refrigeration).
Thanks for reading my blog
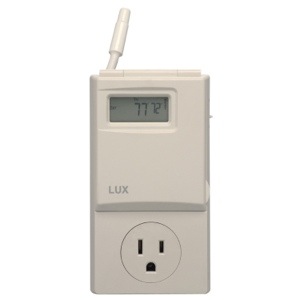
Alarm for home
For holidays Especially in the winter time many people fly off to hot places to enjoy the warm weather not thinking about their house. One of the hardest part of the job I found was going to such a house when their furnace had broken down causing the house to get very cold breaking water lines and causing extension damage. I have seen houses where the furnace had stopped working due to minor problems, which could have been avoided if they had a low temperature alarm. Water lines would freeze then it warms up outside and the water lines break open spraying water all over house until they returned home.
Insurance company would not pay for damage because of a little clause they had for houses when they are unoccupied. Most insurance company’s clause say the house must be check every 72 house or insurance will not cover damage. I recommend talking to your insurance company about how often the house should be check when going on vacation. The grace time changes with each insurance company and each agreement.
One way freezing your house could be avoided is with this little thermostat, all you need to do is plug into a lamp and ask neighbor to watch for a light on. If they do see light they should call an emergency number you have setup with them. But of course light bulbs can burn out or electrics fail so be careful to still have someone check house as per insurance company requirements. Check out my affiliate Amazon for this alarm
<a href=”http://Filtrete UA01DC-6 Ultimate Allergen Reduction Filters, 1900 MPR, 16 x 25 x 1, 6-Pack “>Amazon